Swift and SwiftUI Products Help Contact

SwiftUI Tutorial - Markdown Editor

SwiftUI tutorial covering document based applications

In this tutorial, we're going to cover how easy it is to make a document based application, with all the included trimmings, create a custom control to improve the experience and tap into Apple's AppKit to provide a more powerful version of a SwiftUI control.

This tutorial assumes that you have some experience developing for the Mac, Xcode 15 or newer and macOS Ventura or newer.

This tutorial takes about an hour. The full source code is available MarkdownEditorSourceCode.zip.

Published: April 14th 2025

1. Getting started

Open Xcode, click on the "File" menu, then select "New" and then "Project".

Select "macOS" and then select "Document App" in the new project window. Click on "Next".

Enter "Markdown Editor" as the project name, "SwiftUI" for the interface and "Swift" for the language.

Click on "Next" and choose somewhere to save the project (the desktop should be fine). You should end up with a window looking like the below.

Now run the project by clicking the play icon in the toolbar.

You now have a document based plain text editor, explore all the menu items, enter some text, undo it, create a new tab, save etc. All of this functionality is provided for you, all you have to do is to create a document based application to get access to it.

2. Add support for Markdown files

Having the default template be a plain text editor is a massive time saver for us wanting to edit Markdown files, but we need to tell our app to use Markdown instead of plain text.

Select the first "Markdown Editor" in the source bar to reveal project details. Then select "Markdown Editor" from the "Target" heading right next to the Source list. Finally select "Info" from the tab bar in the main content area of the window.

Expand the disclosure triangle next to "Document Types" this is where we specify to the macOS what kind of files our app can open. Just before the next heading of "Exported Type Identifiers", there is a pale grey "+" icon, click it to add a new document type.

Enter in "Markdown Text" for the name, and "net.daringfireball.markdown" for the Identifier. Then use the disclosure triangle next to Document Types to close that section.

Now use the disclosure triangle next to "Imported Type Identifiers" to reveal it's contents. Imported Type Identifiers are where we include details about a file type that we work with, but isn't exclusive to our application. Again find and click the Pale "+" at the bottom of the Imported Type Identifiers list and before the "URL Types" section.

This time enter in the following information.

Description:Markdown Text
Extensions:md, mdown, markdown, text
Identifier:net.daringfireball.markdown
Mime Types:text/markdown, text/x-markdown, text/x-web-markdown
Conforms To:public.plain-text

Now we've specified the file format, lets alter the code to use it. Select "Markdown_EditorDocument.swift" in the source list.

Modify the extension UTType { ... } code to match below

extension UTType { static var markdownFiles: UTType { UTType( importedAs: "net.daringfireball.markdown" ) } }

This will create a type property on the UTType struct identifying markdown files. Once changed you should also see an error in the IDE as the .exampleText type no longer exists. Update this type to .markdownFiles

static var readableContentTypes: [UTType] { [.markdownFiles] }

This code creates a type property called "readableContentTypes" on our document struct that consists of our markdown files declaration.

Save the project and run it again, you should now be able to save markdown files and open them for editing.

3. Build the user interface

One of the common traits of a Markdown editor is it's live preview of the formatted text. This kind of preview can be very time consuming, but we're going to draw on another feature of SwiftUI and that's built-in Markdown rendering. It doesn't cover the entire formatting specification, but for the sake of this tutorial it will do.

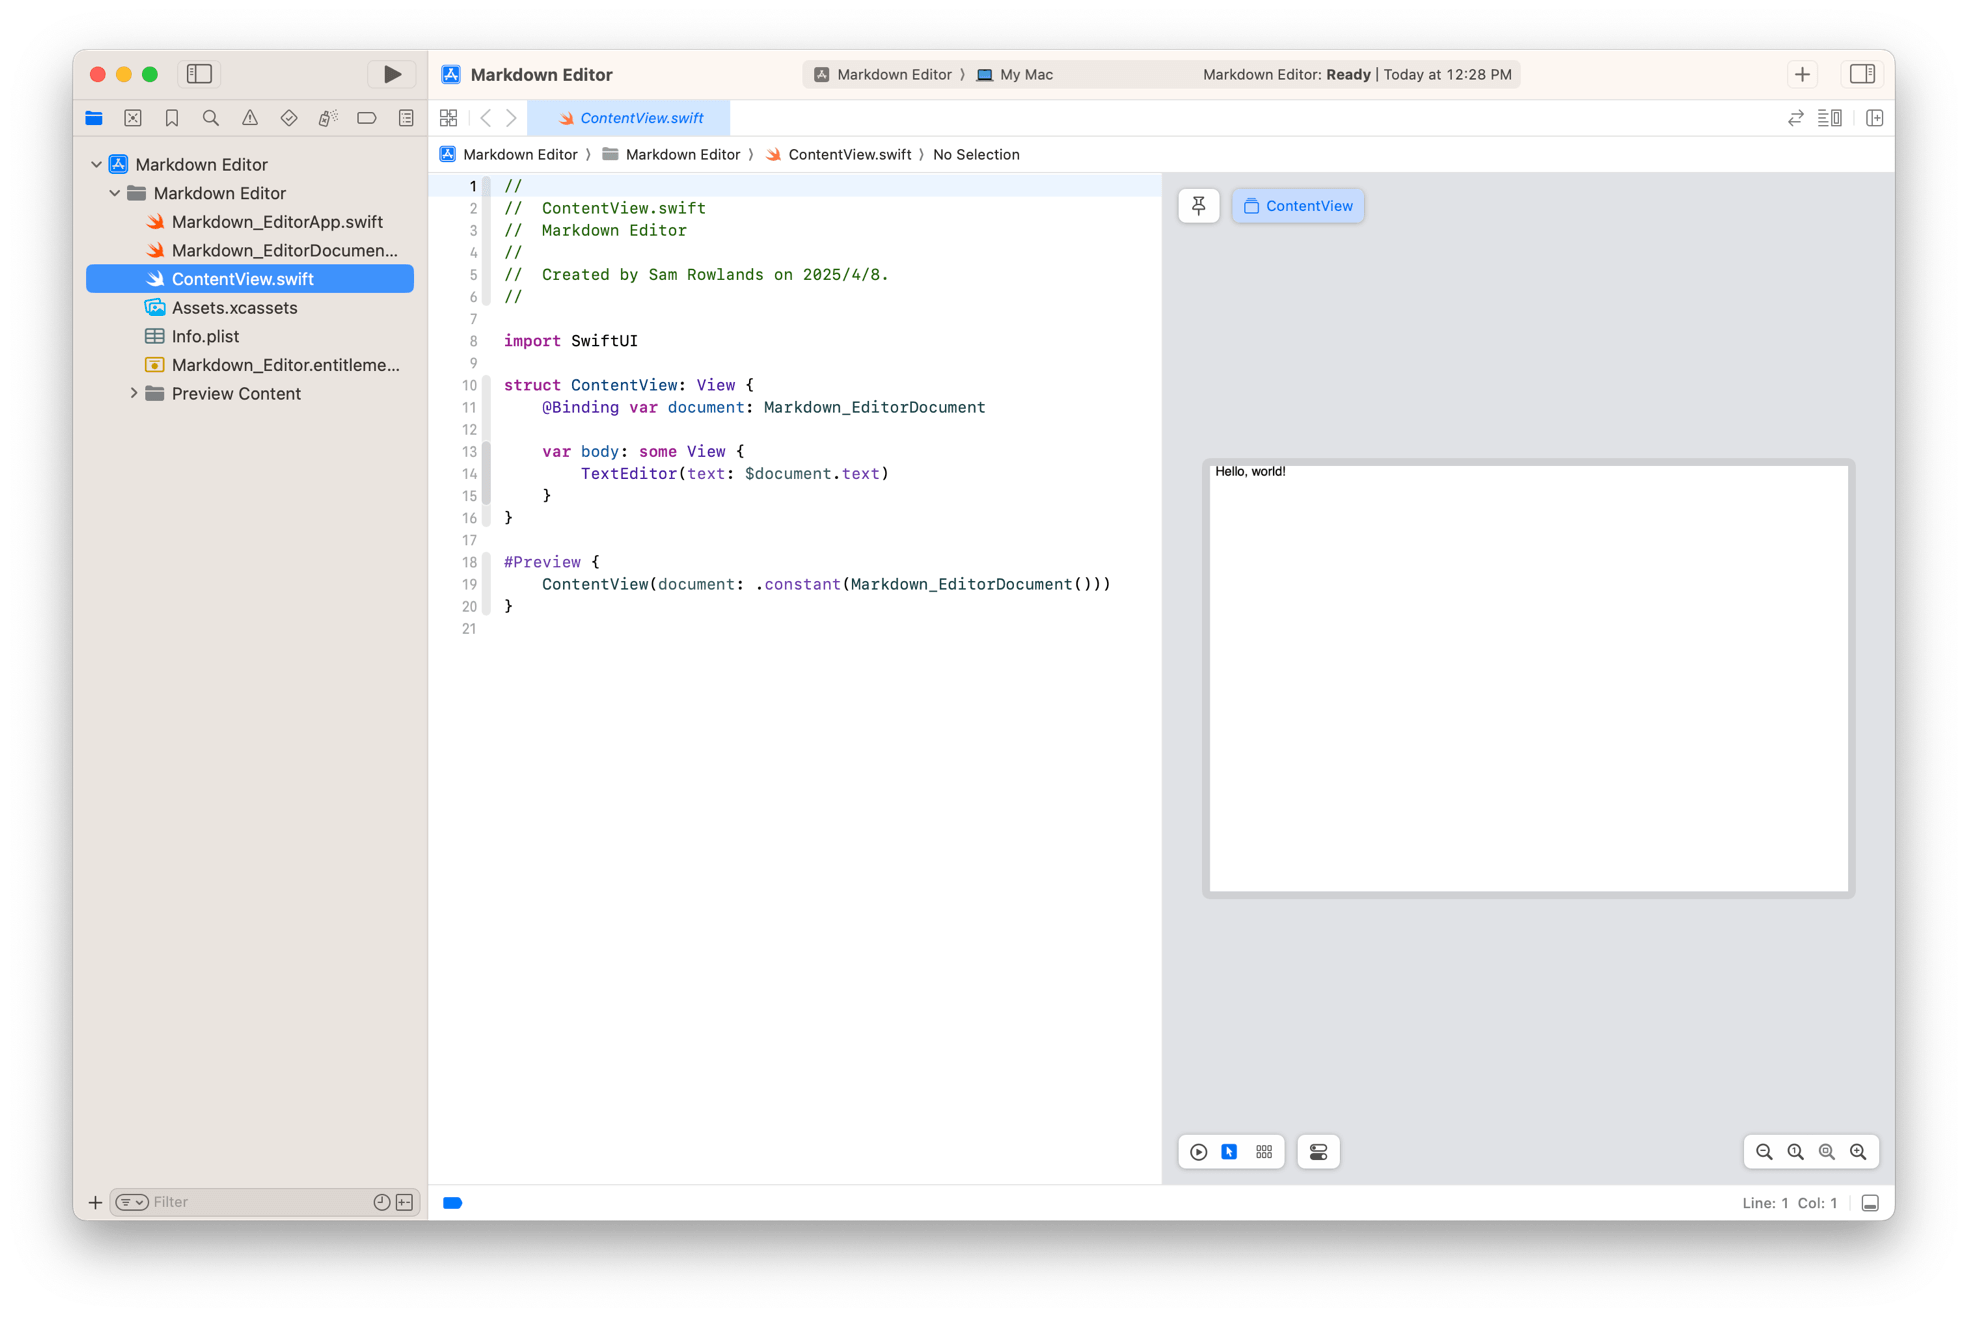
Select "ContentView.swift" from the sidebar. The first thing I want to do is to alter the font of the text editor. For this we'll use the .font modifier. Modifiers allow us to customize our SwiftUI views. There are lots of modifiers for all sorts of customization, but for the moment, we're only going to focus on what we need.

Find the var body: some View { ... } code block and add a new line under TextEditor(text: $document.text), then enter in the modifier code .font( .body ). The .body value is the same standard font used elsewhere in SwiftUI.

var body: some View { TextEditor(text: $document.text) .font( .body ) }

The preview should update showing the text "Hello World" in a much easier to read font than before.

Beneath the .font modifier, add the following line of code Text( "[Click here to visit the Ohanaware website](https://www.ohanaware.com)" ) This Text view simply displays one or more lines of text.

Once again the preview should update and we can see a text label reading "Click here to visit the Ohanaware website". We entered in a markdown link and it's correctly displaying it. Run the project and click on that link, it takes you to the Ohanaware website. This is how we can preview and interact with markdown.

Now wrap the TextEditor and Text code in a HSplitView { ... } as shown below. A HSplitView will align the views horizontally and give us a divider that can be dragged to the left or right to increase or decrease control sizes.

var body: some View { HSplitView { TextEditor(text: $document.text) .font( .body ) Text( "[Click here to visit the Ohanaware website](https://www.ohanaware.com)" ) } }

The preview will update once again, and this time the TextEditor and Text views are horizontally in line with each other, but their sizes look wrong.

We'll fix that by using the .frame modifier on both the TextEditor and the Text views so they have the same width and height. Beneath the .font( .body ) modifier line add the following code .frame( maxWidth: .infinity, maxHeight: .infinity ).

Then add the same modifier beneath the Text ( ... ) view line. Once done, the preview will update and it should look better. Run the project, find the middle of the window and drag it left and right. Perfect.

But the Text is centered and that isn't what we want, which we can fix by altering the Text .frame modifier to include alignment.

Change the modifier to .frame( maxWidth: .infinity, maxHeight: .infinity, alignment: .topLeading ). Notice the alignment is .topLeading and not topLeft, this is because on a right-to-left system, it would be aligned to the right. Neat huh?

The Text is now aligned correctly, but it's right up close to the edge, that is not a problem as we'll just add a .padding() modifier to the Text view. Your code should now look like below.

var body: some View { HSplitView { TextEditor(text: $document.text) .font( .body ) .frame( maxWidth: .infinity, maxHeight: .infinity ) Text( "[Click here to visit the Ohanaware website](https://www.ohanaware.com)" ) .frame( maxWidth: .infinity, maxHeight: .infinity, alignment: .topLeading ) .padding() } }

If you run the project now, you can type in markdown, you can adjust the preview size via the HSplitView, but our text constantly displays a link to the Ohanaware website, where as we want it to show a preview of what we entered in the left hand side. For this to work, change the Text View line to Text( document.text ).

Notice how when we used document.text with the TextEditor, theres a dollar sign in front, but not with Text, that's because the TextEditor takes a Binding to a String property and not the value of the String property. If it took just the value, when you change the text in the TextEditor the actual document wouldn't get updated.

Run the project and enter the following into the TextEditor This is some **bold** text, while this is *italic* and this is ~strikethrough~. While the text auto updates every time we change it, it's not respecting the Markdown, we know the Text view can display markdown as we saw earlier so what gives?

When you hardcode some text into a Text view, it automatically makes this Localizable, which simplifies translating a program, but it's this localizable text that can render markdown. So we need to tell SwiftUI to use a LocalizedStringKey by casting our string into one. Once again change the Text code, so it now reads Text( LocalizedStringKey( document.text ) ).

var body: some View { HSplitView { TextEditor(text: $document.text) .font( .body ) .frame( maxWidth: .infinity, maxHeight: .infinity ) Text( LocalizedStringKey( document.text ) ) .frame( maxWidth: .infinity, maxHeight: .infinity, alignment: .topLeading ) .padding() } }

Run the project and bing badda bom, it now uses the markdown formatting. Congratulations you've made a multi document Markdown editor, that automatically supports multiple windows, window tabs, opening, saving, undo, redo, version history and window restoration.

4. More Window Restoration via a custom control

If you have Window Restoration enabled, you'll notice that every-time you run the project, the window size and position are how you left them last time, and TextEditor contents are the same. If you have Window Restoration disabled, turn it on for this next part. Go to System Settings ➜ Desktop & Dock ➜ Close Windows when quitting an application, make sure the toggle is set to off.

The HSplitView doesn't preserve it's position with Window Restoration and that kind of ruins the moment. Thankfully we can create a custom control to deal with this.

The following code I adapted from "Rob N" over at StackOverflow.

Below the struct ContentView { ... } code, add another struct called HSplitterView.

struct HSplitterView: View { }

Inside this struct add two properties, one is a binding (remember the TextEditor) and one is a private optional property (as indicated by the ? after the value type). Optional properties can be nil or can contain a value.

@Binding var position: Double @State private var positionStart: Double?

Below these two properties (still inside the struct), insert the init function. So that when we create an instance of this struct we pass it the property we want to bind the splitter value to.

init( position: Binding<Double> ) { self._position = position }

Now insert how the View is going to look, a 3 pixel wide Rectangle shape with filling of transparency. Notice the .onHover modifier will adjust the mouse cursor according to the isHovering boolean.

var body: some View { Rectangle() .fill( .gray.opacity(0.0) ) .frame( width: 3 ) .onHover { isHovering in if isHovering { NSCursor.resizeLeftRight.push() } else { NSCursor.pop() } } .gesture( drag ) }

Lastly, below the var body: some View { ... } we need to add the code to handle the drag gesture.

var drag: some Gesture { DragGesture( minimumDistance: 10, coordinateSpace: CoordinateSpace.global ) .onChanged { inValue in if positionStart == nil { positionStart = position } position = positionStart! + Double( inValue.location.x - inValue.startLocation.x ) } .onEnded { _ in positionStart = nil } }

The completed code should look like below.

struct HSplitterView: View { @Binding var position: Double @State private var positionStart: Double? init( position: Binding<Double> ) { self._position = position } var body: some View { Rectangle() .fill( .gray.opacity(0.0) ) .frame( width: 3 ) .onHover { isHovering in if isHovering { NSCursor.resizeLeftRight.push() } else { NSCursor.pop() } } .gesture( drag ) } var drag: some Gesture { DragGesture( minimumDistance: 10, coordinateSpace: CoordinateSpace.global ) .onChanged { inValue in if positionStart == nil { positionStart = position } position = positionStart! + Double( inValue.location.x - inValue.startLocation.x ) } .onEnded { _ in positionStart = nil } } }

Now we need to modify the ContentView struct to use our HSplitterView struct. Make sure you can see the ContentView struct code and double-click on HSplitView, and change it to HStack. A HStack view, will place all the views in it's closure in a horizontal row. Now under the @Binding var document... line, add the following line of code.

@SceneStorage( "ContentView.splitter" ) private var splitterPosition: Double = 250

This will create a property that is preserved through Window Restoration, which will store our splitter position.

Now we need to change the frame for the TextEditor, so that it respects the width from the custom splitter. Under TextEditor, highlight the .frame( ... ) modifier and attributes, then replace with the following code. This will set the width of the TextEditor to be the same as the splitter location.

.frame( width: CGFloat( splitterPosition ) ) .frame( maxHeight: .infinity )

Notice how we're stacking two of the same modifier, but with different attributes?

Lastly we need to add the splitter to the view, in between the TextEditor modifiers and the Text view, add the following line. HSplitterView( position: $splitterPosition ).

var body: some View { HStack { TextEditor(text: $document.text) .font( .body ) .frame( width: CGFloat( splitterPosition ) ) .frame( maxHeight: .infinity ) HSplitterView( position: $splitterPosition ) Text( LocalizedStringKey( document.text ) ) .frame( maxWidth: .infinity, maxHeight: .infinity, alignment: .topLeading ) .padding() } }

Run the project, drag the splitter view side to side and quit the project, when you run it again, the splitter should recall it's position.

5. Use a better text editor from Apple's AppKit

The TextEditor in SwiftUI ticks the box of offering a way to edit a large volume of text, but that's about all it does. Apple have a much more powerful text editor already in the macOS as part of their AppKit framework, so we're going to wrap that instead. As the AppKit control is called NSTextView, we're going to name our wrapper NSTextEditor.

Start by selecting "New" from the "File" menu, then select "File...". In the template selector, choose "Swift File". Name it "NSTextEditor.swift"

Replace import Foundation with the frameworks that we'll need, which is SwiftUI and Apple's AppKit.

import AppKit import SwiftUI

Now we create the struct for our NSTextEditor.

struct NSTextEditor: NSViewRepresentable { }

Insert the following two properties (inside the curly braces), notice how the top one is a binding to a String, this is how we can edit the text but using a more powerful AppKit view instead.

@Binding var text: String var customize:( NSTextView ) -> Void = { _ in }

The second property takes a closure, or block of code that allows us to customize the NSTextView view directly from the SwiftUI layout, which I think is not only pretty neat, but it can help us later on.

Ignore the Xcode warning for the moment as we'll implement all the required functions in good time. First we need to create a Coordinator as this is used by some of the following functions. Enter in the following code.

class Coordinator: NSObject, NSTextViewDelegate { var field: NSTextEditor? func textDidChange(_ notification: Notification) { guard let textView = notification.object as? NSTextView else { return } field?.text = textView.string } func textView(_ textView: NSTextView, doCommandBy commandSelector: Selector) -> Bool { switch commandSelector { case #selector( NSResponder.insertTab(_:) ): textView.window?.selectNextKeyView(nil) return true case #selector( NSResponder.insertBacktab(_:) ): textView.window?.selectPreviousKeyView(nil) return true default: return false } } init( field: NSTextEditor ) { self.field = field } }

Fairly straightforward, this class has an optional property field, which is an instance of our main struct NSTextEditor, it has a simple initializer, a function for handling when the text changed, and a function for handling the tab keys. That textDidChange and textView( doCommandBy ) functions come from the NSTextViewDelegate protocol, which we declared our coordinator to be. There's a lot more functionality available, but we don't need anything else right now.

The textDidChange is where we update our text property to match the NSTextEditor. textView( doCommandBy ) is where we capture the tab key and use it to shift focus to the next or previous item in the window. If you want to allow the customer to enter tabs into your field, simply don't include this function.

Notice the guard let in the texteDidChange function, that's one way to ensure optional values (ones with a ? at the end) are not nil, as well as in this case to ensure that the property notification.object is actually a NSTextView. I like using this pattern because it'll exit early if there's a problem. We can include a print statement in there if we want letting us know that a problem occurred.

field?.text is another way of working with optional variables, if field is nil, the rest of the code in that line won't execute. It's neat and tidy, but has the downside that we have no way of reporting a problem.

Now we can add the function for creating an instance of our coordinator.

func makeCoordinator() -> Coordinator { Coordinator( field: self ) }

This function is pretty simple as all it does is returns a Coordinator class using itself as the property.

Then we'll add the makeNSView function to below the makeCoordinator function.

func makeNSView(context: Context) -> NSScrollView { let scrollView: NSScrollView = NSTextView.scrollableTextView() let textView: NSTextView = scrollView.documentView as! NSTextView textView.delegate = context.coordinator textView.textContainerInset = .init(width: 0, height: 2) textView.string = text textView.allowsUndo = true textView.font = NSFont.preferredFont(forTextStyle: .body) textView.isContinuousSpellCheckingEnabled = true textView.isGrammarCheckingEnabled = true textView.enclosingScrollView?.focusRingType = .exterior scrollView.borderType = .bezelBorder customize( textView ) return scrollView }

The first line of code uses the factory method NSTextView.scrollableTextView() to create a NSTextView that's wrapped in a NSScrollView. The second line extracts the NSTextView into a property called textView. Most of this code is simply customizing how the view is going to look.

One thing to note is the use of textView.enclosingScrollView as this allows us to modify the ScrollView wrapper of the NSTextView without needing a reference to it.

We return the scrollView instead of the textView because we want automatically scrolling in our SwiftUI view.

Lastly we need to add the updateNSView function, all this function does is make sure the coordinator is correct (which can be wrong), make sure the delegate is correct and then update the textView.string with the text if it doesn't match.

func updateNSView(_ nsView: NSScrollView, context: Context) { context.coordinator.field = self guard let textView = nsView.documentView as? NSTextView else { return } textView.delegate = context.coordinator if textView.string != text { let range = textView.selectedRange() textView.string = text textView.setSelectedRange( range ) } }

The completed code for the NSTextEditor should look like below.

import AppKit import SwiftUI struct NSTextEditor: NSViewRepresentable { @Binding var text: String var customize:( NSTextView ) -> Void = { _ in } class Coordinator: NSObject, NSTextViewDelegate { var field: NSTextEditor? func textDidChange(_ notification: Notification) { guard let textView = notification.object as? NSTextView else { return } field?.text = textView.string } func textView(_ textView: NSTextView, doCommandBy commandSelector: Selector) -> Bool { switch commandSelector { case #selector( NSResponder.insertTab(_:) ): textView.window?.selectNextKeyView(nil) return true case #selector( NSResponder.insertBacktab(_:) ): textView.window?.selectPreviousKeyView(nil) return true default: return false } } init( field: NSTextEditor ) { self.field = field } } func makeCoordinator() -> Coordinator { Coordinator( field: self ) } func makeNSView(context: Context) -> NSScrollView { let scrollView: NSScrollView = NSTextView.scrollableTextView() let textView: NSTextView = scrollView.documentView as! NSTextView textView.delegate = context.coordinator textView.textContainerInset = .init(width: 0, height: 2) textView.string = text textView.allowsUndo = true textView.font = NSFont.preferredFont(forTextStyle: .body) textView.isContinuousSpellCheckingEnabled = true textView.isGrammarCheckingEnabled = true textView.enclosingScrollView?.focusRingType = .exterior scrollView.borderType = .bezelBorder customize( textView ) return scrollView } func updateNSView(_ nsView: NSScrollView, context: Context) { context.coordinator.field = self guard let textView = nsView.documentView as? NSTextView else { return } textView.delegate = context.coordinator if textView.string != text { let range = textView.selectedRange() textView.string = text textView.setSelectedRange( range ) } } }

Let's add our NSTextEditor to our interface, switch back to "ContentView.swift", replace TextEditor(text: $document.text) with NSTextEditor(text: $document.text), then run the project.

Now we have spelling and grammar checking, along with a proper focus ring.

You can remove the line .font( .body ) from below NSTextEditor as it no longer does anything, we're setting the font in makeNSView function of our NSTextEditor. In the future we can use the customization closure to alter this for specific situations.

6. Calling AppKit functions from SwiftUI

The SwiftUI paradigm is great until it isn't, and in the case of using a NSTextView, we have no way of taking advantage of some of the functions of a NSTextView as ContentView never stores the NSTextView (or it's wrapping NSScrollView) in a property.

The way around this is to use the closure we added to the NSTextEditor class to get the NSTextView and another class attached to the view to hold it as a property. We could just use a property on our ContentView to hold a reference to the NSTextView, but you'll see why I'm using a helper class later on in the tutorial.

Switch to "ContentView.swift" in the source list. Under import SwiftUI, add the following class.

public class ContentViewHelper: ObservableObject { var textEditor: NSTextView? = nil public func insertHorizontalRule() { guard let textEditor = textEditor else { print( "ContentViewHelper.\(#function) textEditor is nil") return } textEditor.insertText( "\n---\n", replacementRange: textEditor.selectedRange() ) } }

This class has one optional property for storing the NSTextView (which is defaulted to nil) and one function for inserting a Markdown line break at the current cursor. If the textEditor property is nil, the guard let will execute the else code, printing a line to the console letting us know it failed, otherwise we get our horizontal rule.

Now we need to add this class as a property to the ContentView struct, under @SceneStorage add the following line.

@StateObject private var helper = ContentViewHelper()

I used the @StateObject attribute because I want this class to only be initialized once during the View's lifetime. However this combination allows for more flexibility down the road.

Next we need to set the textEditor property on our new class instance, we'll use the closure we added to the NSTextEditor struct. Replace the line NSTextEditor(text: $document.text) in the ContentView struct with the following code.

NSTextEditor(text: $document.text) { textEditor in helper.textEditor = textEditor }

The property being passed into to our closure is named textEditor and we simply set the helper.textEditor to that property.

So now we can call helper.insertHorizontalRule() to insert a markdown horizontal rule at the cursor, but where to place the button to do this? The ideal location is the Toolbar.

At the end of the HStack { ... } insert this code to create a toolbar button that can insert a horizontal rule into our markdown.

.toolbar(id:"ContentView.toolbar"){ ToolbarItem(id: "insert-rule") { Button( "Insert Rule", systemImage: "rectangle.split.1x2" ) { helper.insertHorizontalRule() } .help( "Inserts a horizontal rule" ) } }

The Button struct type is the same whether we're adding a button to a menu, toolbar, touch bar, window or view. In this instance we're using a SF Symbol as the icon and added a Tooltip (.help) for accessibility.

The completed changes should look like below.

import SwiftUI public class ContentViewHelper: ObservableObject { var textEditor: NSTextView? = nil public func insertHorizontalRule() { guard let textEditor = textEditor else { print( "ContentViewHelper.\(#function) textEditor is nil") return } textEditor.insertText( "\n---\n", replacementRange: textEditor.selectedRange()) } } struct ContentView: View { @Binding var document: Markdown_EditorDocument @SceneStorage( "ContentView.splitter" ) private var splitterPosition: Double = 250 @StateObject private var helper = ContentViewHelper() var body: some View { HStack { NSTextEditor(text: $document.text) { textEditor in helper.textEditor = textEditor } .frame( width: CGFloat( splitterPosition ) ) .frame( maxHeight: .infinity ) HSplitterView( position: $splitterPosition ) Text( LocalizedStringKey( document.text ) ) .frame( maxWidth: .infinity, maxHeight: .infinity, alignment: .topLeading ) .padding() } .toolbar(id: "ContentView.toolbar") { ToolbarItem(id: "insert-rule") { Button( "Insert Rule", systemImage: "rectangle.split.1x2" ) { helper.insertHorizontalRule() } .help( "Inserts a horizontal rule" ) } } } }

Run the project and click on the "Insert Rule" button. Move the cursor somewhere else in your text and click it again. Don't worry if you don't like it, because you can always undo it. Right click on the Toolbar to get view options and the ability to customize what buttons appear there. This functionality comes for free if you specify an id when creating a toolbar, if you don't want that, simply remove the id from the .toolbar initializer.

7. Little touches

So we've got our Markdown editor and it works, live updates every time the text is changed. But what happens when we enter in too much text to be displayed at once. The answer is nothing, the text is clipped, but it's not in our editor (remember the NSTextView is wrapped in a NSScrollView), so lets do the same for our Text view. Make sure that "ContentView.swift" is still selected and simply wrap the Text view in a ScrollView { ... } like so.

ScrollView { Text( LocalizedStringKey( document.text ) ) .frame( maxWidth: .infinity, maxHeight: .infinity, alignment: .topLeading ) .padding() }

Run the project, paste in a large amount of text (enough to make it clipped) and then use the scroll wheel or trackpad to scroll the Text view. That was easy.

To prevent people from making the window really really small, select "Markdown_EditorApp.swift" from the sidebar. Under the ContentView(document: file.$document) line add the following modifier. This is where we specify the minimum size of the window.

.frame( minWidth: 500, minHeight: 300 )

Under the DocumentGroup { ... } add the following modifier. This will tell SwiftUI we want to use the size we specified for the ContentView ( ... ) as the window size.

.windowResizability(.contentSize) @main struct Markdown_EditorApp: App { var body: some Scene { DocumentGroup(newDocument: Markdown_EditorDocument()) { file in ContentView(document: file.$document) .frame( minWidth: 500, minHeight: 300 ) } .windowResizability(.contentSize) } }

8. Handling menu actions in the document

Creating menus in SwiftUI is easy, you simply use the .commands modifier on a scene (App Struct), to define and handle the actions. The trouble is there's no way to handle menu actions from our ContentView or lower Views. I personally think there really should be and maybe in a newer version of SwiftUI there might be. In the mean time we have a workaround, and that's to utilize SwiftUI's @FocusedValue attribute and our helper class we created earlier.

This solution originally came from a combination of two other articles, 1 from Sarah Reichelt and 1 from Daniel Saidi.

Switch to "ContentView.swift" and insert the following code under the public class ContentViewHelper: ObservableObject { ... } declaration.

public struct CurrentHelperFocusedValueKey: FocusedValueKey { public typealias Value = ContentViewHelper } public extension FocusedValues { typealias CurrentHelper = CurrentHelperFocusedValueKey var currentHelper: CurrentHelper.Value? { get { self[CurrentHelper.self] } set { self[CurrentHelper.self] = newValue } } }

These two declarations are what is needed to take advantage of the focusing system. Notice in the second declaration we actually create a computed property called currentHelper.

While still in ContentView.swift, you'll need to set the focused property to our helper when focus is on this scene. Add the following line under the .toolbar { ... } modifier.

.focusedSceneValue( \.currentHelper, helper )

The first sections of "ContentView.swift" should now look like below.

import SwiftUI public class ContentViewHelper: ObservableObject { var textEditor: NSTextView? = nil public func insertHorizontalRule() { guard let textEditor = textEditor else { print( "ContentViewHelper.\(#function) textEditor is nil") return } textEditor.insertText( "\n---\n", replacementRange: textEditor.selectedRange()) } } public struct CurrentHelperFocusedValueKey: FocusedValueKey { public typealias Value = ContentViewHelper } public extension FocusedValues { typealias CurrentHelper = CurrentHelperFocusedValueKey var currentHelper: CurrentHelper.Value? { get { self[CurrentHelper.self] } set { self[CurrentHelper.self] = newValue } } } struct ContentView: View { @Binding var document: Markdown_EditorDocument @SceneStorage( "ContentView.splitter" ) private var splitterPosition: Double = 250 @StateObject private var helper = ContentViewHelper() var body: some View { HStack { NSTextEditor(text: $document.text) { textEditor in helper.textEditor = textEditor } .frame( width: CGFloat( splitterPosition ) ) .frame( maxHeight: .infinity ) HSplitterView( position: $splitterPosition ) ScrollView { Text( LocalizedStringKey( document.text ) ) .frame( maxWidth: .infinity, maxHeight: .infinity, alignment: .topLeading ) .padding() } } .toolbar(id: "ContentView.toolbar") { ToolbarItem(id: "insert-rule") { Button( "Insert Rule", systemImage: "rectangle.split.1x2" ) { helper.insertHorizontalRule() } .help( "Inserts a horizontal rule" ) } } .focusedSceneValue( \.currentHelper, helper ) } }

Select "Markdown_EditorApp.swift" from the sidebar. Just inside at the top of the struct Markdown_EditorApp: App { ... } add the following line of code to declare our currentHelper property, making it accessible to menu actions.

@FocusedValue( \.currentHelper ) var currentHelper

Next skip to below .windowResizability(.contentSize) and add the following code.

.commands { CommandGroup(after: .textEditing) { Button( "Insert Horizontal Rule" ) { currentHelper?.insertHorizontalRule() } .disabled( currentHelper == nil ) } }

This short block of code is what creates the menu item, and positions it after the standard editing tools (such as cut, copy and paste). Once again we use a Button and this time give it the label "Insert Horizontal Rule". When the menu item is selected we simply call the appropriate function on the focused helper class. Just to be sure that we don't allow the user to do this when there's no windows open, we'll disable the menu item if the currentHelper is nil.

Run the project, and then select "Insert Horizontal Rule" from the Edit menu. It works just the same as clicking on the toolbar button.

If we wanted we could add an Icon to the menu item, the same way we did for the toolbar, but... as icons are not common place in menus, you need to use a modifier on the button to get it to show .labelStyle( .titleAndIcon )

import SwiftUI @main struct Markdown_EditorApp: App { @FocusedValue( \.currentHelper ) var currentHelper var body: some Scene { DocumentGroup(newDocument: Markdown_EditorDocument()) { file in ContentView(document: file.$document) .frame( minWidth: 500, minHeight: 300 ) } .windowResizability(.contentSize) .commands { CommandGroup(after: .textEditing) { Button( "Insert Horizontal Rule", systemImage: "rectangle.split.1x2" ) { currentHelper?.insertHorizontalRule() } .disabled( currentHelper == nil ) .labelStyle(.titleAndIcon) } } } }

And that's a wrap...

Hopefully you've found this tutorial to be quite useful in demonstrating how you can get a lot of standard Mac functionality with very little code, how to create custom controls, how to embed AppKit controls (and utilize functionality from them).

This is the kind of tutorial I was looking for when I first started to learn SwiftUI for the macOS. I have experience in building macOS applications and wanted to learn how to do things that I'm used to doing in other tools.

There's still a lot of SwiftUI on macOS functionality we could talk about, but we'll save it for other tutorials.

If you have any questions or comments, please feel free to use the Contact page to get in touch with me.

  • Sleep Aid, our Mac Sleep troublshooter See what your Mac does when it should be asleep - Sleep Aid
  • Ohanaware © 2007 - 2025 Ohanaware Co., Ltd. Registered in Taiwan R.O.C. 🇹🇼
    Site managed by Strawberry Software's Lifeboat - running on DigitalOcean's platform.

    Pages

    Products Contact Us Weblog SwiftUI Dev Promotions

    Company

    About Us Environment Privacy Terms Update Plans

    Connect

    Bluesky Facebook Threads X / Twitter Mailing List