Home
Guides
Interfaces
Troubleshooting
Developing for the App Store
This help guide has been updated for 2022, because of the changes made in the last quarter of 2021.
Over the years the process for developing and submitting for the Mac App Store has become more and more complicated, this guide aims to demystify the process.
Preparation
To start developing or wrap for the Mac App Store, you'll need several things.
- App Wrapper 4.4 or newer
- An active Apple Developer account, visit https://developer.apple.com/account/ in order to make sure the account is valid.
- Register the development Mac with Apple, visit https://developer.apple.com/account/resources/devices/list to register your Mac. The Device UUID can be found in "System Information" under the "Hardware" pane.
- 3 certificates from the Apple site https://developer.apple.com/account/resources/certificates/list. Once downloaded, drag these certificates into the Keychain Access application.
- Apple Development, allows testing of Mac App Store on the development Mac.
- Apple Distribution, for submitting to Apple.
- Mac Installer Distribution, for submitting to Apple
- Registered the bundle identifier (i.e. com.ohanaware.notchedUp) of the application over at https://developer.apple.com/account/resources/identifiers/list. When registering an identifier, this is where you can specify which Apple "Services" the application uses, if any.
- 2 Provision Profiles from the following page. https://developer.apple.com/account/resources/profiles/list
- macOS App Development, make sure that you select the development Mac's UUID when creating this profile.
- Mac App Store, which is used to submit the application to the Mac App Store.
- If you use the Xojo development tool, you'll also need OWStoreKitBridge from https://ohanaware.com/storeKitBridge/.
Configure App Wrapper
- Open the application with App Wrapper, so that a wild document window will appear.
- Select "Provision Profiles" from the sidebar.
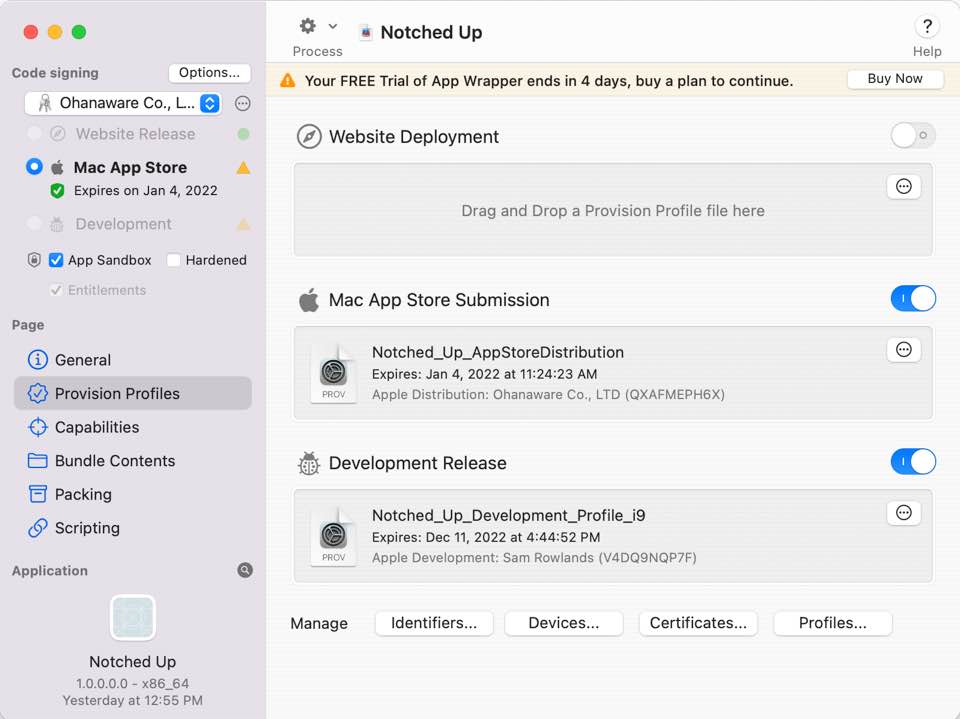
- Add the "macOS App Development" profile to the "Development Release" provision well, either by dragging the file in, or clicking on the action icon and selecting the file.
- Add the "Mac App Store" profile to the "Mac App Store Submission" provision well.
- Make sure that "App Sandbox" and "Entitlement" are checked for both "Mac App Store" and "Development".
- Click on the "Mac App Store" label under the "Code signing" heading of the sidebar. Select these options if they're unchecked.
- Click on the "Development" label under the "Code signing" heading of the sidebar, select these options if they're unchecked.
- Click on the "Options" button under the "Code signing" heading, then ensure that "Use Apple Developer channel for debugging App Store application" is checked.
- Select "General" from the sidebar and fill in any information related to the application.
- Select "Capabilities" from the sidebar and select options that the application will need, fill in any matching "Privacy Usage" fields.
- Select "Packing" from the sidebar, scroll down to "Submit to Apple", Either select an account from the menu next to "Developer Account" or select "Add Account".
If you're adding an account, click on the "?" below "App-Specific Password" to read Apple's instructions on creating a password that App Wrapper can use. Also use the "Verify Account' button to make sure that the credentials are valid.
- Select " App Store Submission" next to "Auto-Submit".
Configure Xojo
If you do not use the Xojo development tool, you can skip this step. Otherwise these steps will integrate App Wrapper with Xojo. Once completed, App Wrapper is then used to process the application during debug runs and to fully wrap, pack and submit application when Xojo builds the app.
- Select "Scripting" from the sidebar in App Wrapper.
- Click on the "Copy Script" button.
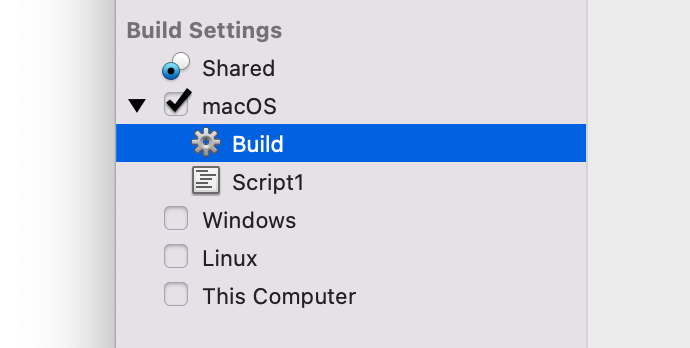
- Switch over to Xojo, and scroll the sidebar to the bottom to reveal the Build options.
 .
.
- Select "macOS", then choose "Insert" from the menubar → "Build Step" → "Script".
- Paste the script from App Wrapper into the newly added script.
- Make sure that the script is below the "Build" step, as shown in the above screenshot.
Handling the Mac App Store DRM
If the application is a paid application or an App Store Reviewer demand DRM be handled even for a FREE application, Ohanaware provide their OWStoreKitBridge class for FREE.
- Download the code from the following URL https://ohanaware.com/storeKitBridge/ if it hasn't already been downloaded.
- Open the project and copy the OWStoreKitBridge class from the project and paste it into the application project.
- Follow the directions in the OWStoreKitBridge project to create and customize a subclass for handling the App Store DRM.
- In the Open event of the App class, include at least the following code to initiate the DRM validation. Importantly, it will fail unless the application is in the Applications folder.
#if not debugBuild then
  Dim nask as new storeKitBridgeExample
  nask.logMode = OWStoreKitBridge.loggingModes.internalOnly
  nask.receiptValidate
#endif
- Switch back to App Wrapper and project within App Wrapper, under the "Code signing" heading select "Development".
- Switch back to Xojo and build the project.
- Once App Wrapper has processed the build, click on the action icon next to the wrapped application, and select "Move to /Applications and launch".
 .
.